- Published on
Write your own lsp from scratch with nodejs and typescript.
- Authors

- Name
- Abhinas Regmi
- @AbhinasRegmi
Introduction
Do you think editor auto-complete and auto-imports are magic 🪄 ? Today we are here to demystify the inner workings of editor magic. We will be implementing (not-developing) a language-server-protocol from scratch according to the specification provided by microsoft.
Lsp can be used by any text-editor like vscode, neovim and so on. You have to see the documentation for individual editor on how to integrate the lsp. Well, I am fond of neovim and I will show the integration with neovim. But worry not. The project will the same for every editor only the integration with the editor varies slightly. I urge you to find your own solution for this problem.
What does this article contain ?
- about lsp
- project setup and initialization
- encoding and decoding messages
- listening to the std-console
- initialize request
- file sync
- hover
- auto completion
- diagnostics
Now let's get started.
Second - Introduction
Well, I have to tell you about lsp before we start to do any work. lsp is an independent piece of software that runs along with your text editor.
Both your editor and lsp have to communicate with each other to pass information. And how does this communication occur ? It works through std-console (it can be other methods too. This is the most popular and we will be using this one). When editor has to send some message to the lsp it will write to std-console and lsp is continously listening to streams on std-console and receives the messages. And reponds appropriately by writing to the std-console again. Now that out of the way.
How does this communication occur ? I mean what is the format of the messages. How to parse these messages ?. To aid with that microsoft has developed some specification using which all the communication must occur. Our work as a developer is to format our messages according to the specs and communicate.
The most important aspect to lsp development is the events or methods. Every message has an associate method along with itself. So what are methods ?
Let's take an example. When you hover over a varible or function in vscode or other editor, you can see the description of that variable or function.

See the popup there. How does this work? So during hover, the editor will publish message with method = textDocument/hover to your lsp server. It contains various information along with method like
- which file the hover is activated from
- which line the hover is activated from
- which characters the hover is activated form
Now the lsp has information about the location from where the hover is triggered. Every lsp has its state synced with editor . It means that lsp has all knowledge about all the files present in the project and state or contents of each file. It will use various analysis tools to determine the information about the hover variable and respond with required information. Now the editor will the use the response to display data like above to the user.
With this little knowledge let's get stated.
Project setup and initialization
I have created a starter template for this ts-project. There is no need to use my starter template. The only requirement is that you should be able to run ts files.
Feel free to copy and paste the following files.
tsconfig.json
{
  "compilerOptions": {
    "module": "commonjs",
    "declaration": true,
    "removeComments": true,
    "emitDecoratorMetadata": true,
    "experimentalDecorators": true,
    "allowSyntheticDefaultImports": true,
    "target": "ES2021",
    "sourceMap": true,
    "outDir": "./dist",
    "baseUrl": "./",
    "incremental": true,
    "skipLibCheck": true,
    "strictNullChecks": false,
    "noImplicitAny": false,
    "strictBindCallApply": false,
    "forceConsistentCasingInFileNames": false,
    "noFallthroughCasesInSwitch": false
  }
}
package.json
{
  "name": "lsp",
  "version": "0.0.1",
  "description": "",
  "license": "UNLICENSED",
  "scripts": {
    "build": "tsc",
    "check": "tsc --noEmit",
    "format:check": "prettier --check \"src/**/*.ts\" \"test/**/*.ts\"",
    "format": "prettier --write \"src/**/*.ts\" \"test/**/*.ts\"",
    "start": "tsx",
    "start:dev": "tsx --watch",
    "start:prod": "node dist/main",
    "lint": "eslint \"{src,apps,libs,test}/**/*.ts\" --fix",
    "test": "jest --passWithNoTests",
    "test:watch": "jest --watch",
    "test:cov": "jest --coverage",
    "test:debug": "node --inspect-brk -r tsconfig-paths/register -r ts-node/register node_modules/.bin/jest --runInBand",
    "test:e2e": "jest --config ./test/jest-e2e.json",
    "validate": "npm run format:check && npm run check && npm run lint && npm run test",
    "prepare": "husky"
  },
  "devDependencies": {
    "@types/express": "^5.0.0",
    "@types/jest": "^29.5.2",
    "@types/node": "^20.3.1",
    "@typescript-eslint/eslint-plugin": "^8.0.0",
    "@typescript-eslint/parser": "^8.0.0",
    "eslint": "^8.0.0",
    "eslint-config-prettier": "^9.0.0",
    "eslint-plugin-prettier": "^5.0.0",
    "jest": "^29.5.0",
    "prettier": "^3.0.0",
    "source-map-support": "^0.5.21",
    "ts-jest": "^29.1.0",
    "ts-loader": "^9.4.3",
    "ts-node": "^10.9.1",
    "tsconfig-paths": "^4.2.0",
    "tsx": "^4.19.2",
    "typescript": "^5.1.3",
    "husky": "^9.1.7"
  },
  "jest": {
    "moduleFileExtensions": [
      "js",
      "json",
      "ts"
    ],
    "rootDir": "src",
    "testRegex": ".*\\.spec\\.ts$",
    "transform": {
      "^.+\\.(t|j)s$": "ts-jest"
    },
    "collectCoverageFrom": [
      "**/*.(t|j)s"
    ],
    "coverageDirectory": "../coverage",
    "testEnvironment": "node"
  }
}
There's a lot of stuff here. Choose the one you require.
Encoding and Decoding Messages
We have already clarified that we will be communicating through std-console. But what is std-console It is the place where any process or program will write its log. When you do console.log it writes to the std-console for that process.
According to the specification every message should contain the following:
A Content-Length header followed by <content-length> with a separator \r\n\r\n finally followed by the <actual-content>.
Content-Length: ...\r\n\r\n
{
	"jsonrpc": "2.0",
	"id": 1,
	"method": "textDocument/completion",
	"params": {
		...
	}
}
Now let's write some functions. Create the following functions. P.S Install zod for validation
// src/rpc/rpc.ts

import * as z from 'zod';

export function encodeMessage(msg: unknown): string {
  let content: string;

  try {
    content = JSON.stringify(msg);
  } catch (error) {
    throw new Error('Failed to encode message: ' + error.message);
  }

  const contentLength = Buffer.byteLength(content, 'utf8');
  return `Content-Length: ${contentLength}\r\n\r\n${content}`;
}

const baseMessageSchema = z.object({
  id: z.number().optional(),
  jsonrpc: z.string(),
  method: z.string(),
});
export type baseMessageT = z.infer<typeof baseMessageSchema>;
export function decodeMessage(msg: Buffer) {
  const [header, body] = msg.toString().split('\r\n\r\n');

  if (!header || !body) {
    return {
      ok: false,
      error: 'Couldnt find the separator',
    };
  }

  const contentLengthBytes = header.substring('Content-Length: '.length);
  const contentLength = Number(contentLengthBytes);

  // validate the json structure to baseMessageSchema
  const contentJson = JSON.parse(body.substring(0, contentLength));
  const baseMessage = baseMessageSchema.safeParse(contentJson);

  if (!baseMessage.success) {
    return {
      ok: false,
      error: "Couldn't decode the json",
    };
  }

  return {
    ok: true,
    value: {
      request: baseMessage.data,
      content: body.substring(0, contentLength),
    },
  };
}
Here, we are ensuring that the json we receive from the std-in confirms to the specification with the help of zod. Become ready to write a tons of zod-schema 🤓.
The objective here is:
- make the payload that we want to send to
editoris according to schema i.e withContent-Lengthand other sutff. - make sure the payload received from the
editoris valid and convert it tojs-objectready to use.
Listening to the std-console
We know that communication will occur through the console. But we ts developers love to spam console to trace logs and errors. However, if we try to do that here. The console will become polluted and can hinder the editor and lsp communication. Thus , we need a robust way to view our logs and error.
We will write all our logs to a file and view that file when required.
// src/utils/logger.ts

import fs from 'node:fs';

export class FileLogger {
  private logStream: fs.WriteStream | undefined;

  constructor(private readonly filename: string) {
    this.logStream = fs.createWriteStream(this.filename, {
      flags: 'w',
      encoding: 'utf8',
    });
  }

  write(message: string) {
    const timestamp = new Date().toISOString();
    this.logStream.write(`[educationalLsp]:[${timestamp}] - ${message} \n`);
  }
}
Yeah, yeah the method is sync. Dont' tell me about how bad the code is. Feel free to write the async version of the code.
Also, we will need some more helpers function. We want to validate whether console message is valid or not. What do i mean here. Well the console may have other logs in addition to our message. I want to make sure we only parse the message that confirms to the standard with is the Content-Length: <length>\r\n\r\n<content>.
So create a new function in your rpc.ts
// src/rpc/rpc.ts

export function checkValidStdMessage(data: Buffer) {
  // check the string obtained in the std console has content-length and it confirms to the standard.

  const [header, body] = data.toString().split('\r\n\r\n');

  if (!header || !body) {
    return {
      ok: false,
      length: 0,
    };
  }

  const contentLengthBytes = header.substring('Content-Length: '.length);
  const contentLength = Number(contentLengthBytes);

  if (data.length < contentLength) {
    return {
      ok: false,
      length: 0,
    };
  }

  const totalDataLength = header.length + 4 + contentLength;

  return {
    ok: true,
    length: totalDataLength,
  };
}
This is required because if you try to parse every message through zod it will error out. And there could be messages not meant for our lsp server.
Finally, in your main.ts
// src/main.ts

import process from 'node:process';

import { FileLogger } from './utils/logger';
import {
  type baseMessageT,
  checkValidStdMessage,
  decodeMessage,
  encodeMessage,
} from './rpc';


// Initialize the process
process.stdin.setEncoding('utf8');
process.stdin.resume();


const globalLogger = new FileLogger(
  '/home/abhinasregmi/development/side/lsp/log.txt', // where you want your log to be placed
);

globalLogger.write('LSP has been started...');

process.stdin.on('data', (data) => {
  const out = checkValidStdMessage(data);

  const { ok, value } = decodeMessage(data);

  if (!ok) {
    globalLogger.write('Got an error during decoding...');
    globalLogger.write(data.toString());
    return;
  }

  if (out.ok) {
    handleStdMessage(value.request, value.content, globalLogger);
  }
});
process.stdin.on('end', () => {}); // Do nothing when the stream ends


function handleStdMessage(
  baseMessage: baseMessageT,
  content: string,
  logger: FileLogger,
) {
  logger.write('Received message with method: ' + baseMessage.method);
If the message is a valid message then we pass the content of the message to handleStdMessage. This is the meat of our lsp.
Now, how will we run this program. Well, It is not our job to execute this script. This has to be done by the editor. The editor is responsible to run this program when it starts.
I will show you how to direct the editor to execute this program. For now, we will direct editor to run this program when it opens a .md file. Why .md? There is no reason for that. You can do this for any file type that you want to create your lsp for.
Create a mylsp.lua file inside ~/.config/nvim/lua folder. And paste the following content
-- ~/.config/nvim/lua

-- warning: I did for testing purpose.
-- you should give the exact location of your script.
-- It is better if you compile your ts and provide the script path.
-- Also make sure you can run the script from any path from the system.
-- For testing, I just used lsp only in the lsp project so the system could find the start:dev script

local client = vim.lsp.start_client {
  name = 'educationalLsp',
  cmd = { 'npm', 'run', 'start:dev' },
}

if not client then
  vim.notify "The lsp client didn't start correctly."
  return
end

vim.api.nvim_create_autocmd('FileType', {
  pattern = 'markdown',
  callback = function()
    vim.lsp.buf_attach_client(0, client)
  end,
})
Now, restart your editor and view the logs
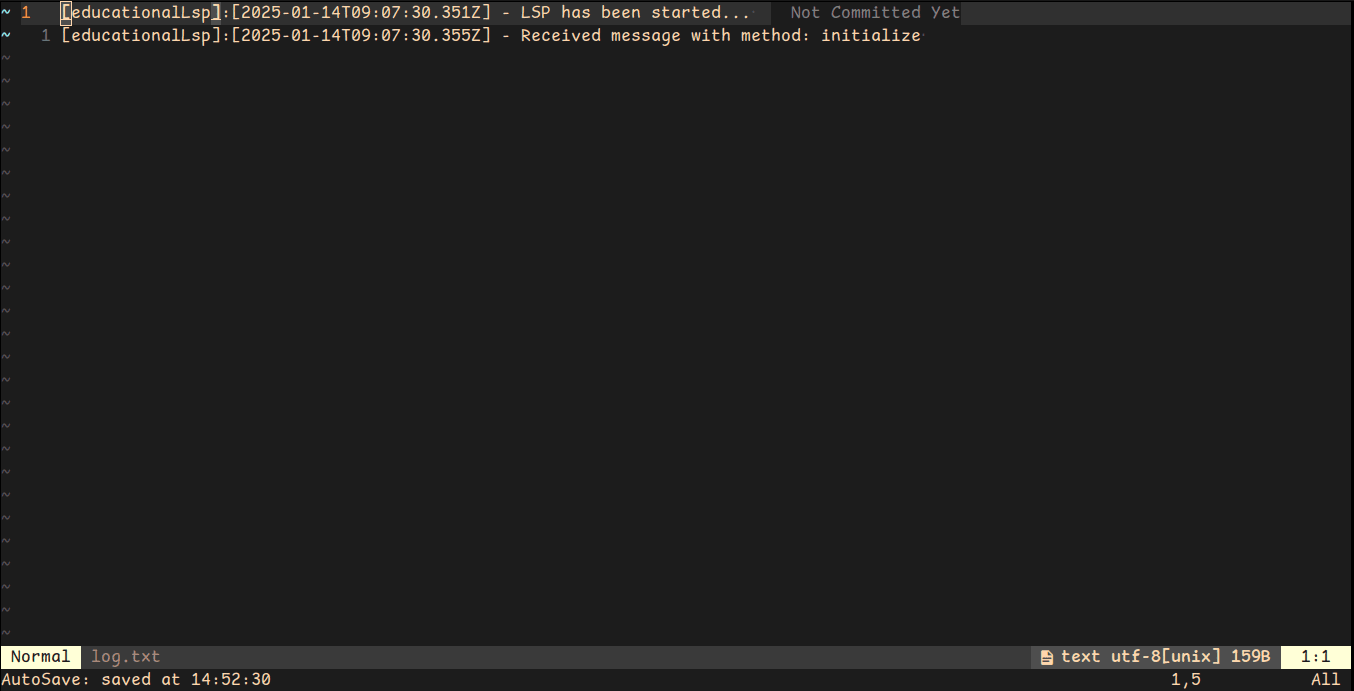
Now, what is initialize ? According to specification "The initialize request is sent as the first request from the client to the server."
Whew, we are now able to decode the message from the server i.e editor and extract the method from the request.
Initialize Request
As we saw earlier, we received an initialize request from the editor. Now what do we do with this message. Well, we will repond to the editor. We will tell editor about out capabilities. There a tons of features that a lsp can implement. Here, we will perform a subset of those with minimal features.
Now, we want to respond to the server by telling them we can perform certain features.
// src/lsp/initialize.ts


import * as z from 'zod';

// request schemas
const clientInfoSchema = z.object({
  name: z.string(),
  version: z.string().optional(),
});

const initializeRequestParamsSchema = z.object({
  clientInfo: clientInfoSchema.optional(),
});

export const initializeRequestSchema = z.object({
  method: z.string(),
  jsonrpc: z.string(),
  id: z.number(),
  params: initializeRequestParamsSchema,
});

const completionOptionsSchema = z.object({});

// response schemas
const serverCapabiliesSchema = z.object({
  textDocumentSync: z.number(),
  hoverProvider: z.boolean().optional(),
  definitionProvider: z.boolean().optional(),
  completionProvider: completionOptionsSchema.optional(),
});

const serverInfoSchema = z.object({
  name: z.string(),
  version: z.string().optional(),
});

const initializeResultSchema = z.object({
  capabilities: serverCapabiliesSchema,
  serverInfo: serverInfoSchema.optional(),
});

export const initializeResponseSchema = z.object({
  id: z.number(),
  jsonrpc: z.string(),
  result: initializeResultSchema,
});

export function newInitializeResponse(
  id: number,
): z.infer<typeof initializeResponseSchema> {
  return {
    id,
    jsonrpc: '2.0',
    result: {
      capabilities: {
        textDocumentSync: 1,
        hoverProvider: true,
        definitionProvider: true,
        completionProvider: {},
      },
      serverInfo: {
        name: 'educationalLsp',
        version: '0.0.1',
      },
    },
  } satisfies z.infer<typeof initializeResponseSchema>;
}
What is happening here? We need to respond with message and the structure of the message should be as follow
{
   id: '<requestid>',
   jsonrpc: '2.0',
   result: {
      capabilities: {

      },
      serverInfo: {
         name: '<lspname>',
         version: '<lspversion>'
      }
   }
}
There can be different type of capabilities like:
- textDocumentSync => it means the lsp and editor will sync the files. Lsp will have a copy of current state of editor
- hoverProvider => it means we support hover actions as shown in example above
- definationProvider => it means we support go-to-definition feature
- completionProvider => it means we support auto-completion feature
All these capabilities are optional and you can choose to keep a subset of them. When you respond with such capabilites the editor will respond with corrosponding messages when event related to required capabilites are triggred in the editor.
Now in our main.ts update your handleStdMessage
// src/main.ts

function handleStdMessage(
  baseMessage: baseMessageT,
  content: string,
  logger: FileLogger,
) {
  logger.write('Received message with method: ' + baseMessage.method);

  const jsonContent = JSON.parse(content);

  switch (baseMessage.method) {
    case 'initialize': {
      const { success, data, error } =
        initializeRequestSchema.safeParse(jsonContent);

      if (!success) {
        logger.write("Couldn't parse json for initialize => " + error.message);
      }

      // respond to initialize message to the server
      const message = newInitializeResponse(data.id);
      const reply = encodeMessage(message);

      // send to the server
      process.stdout.write(reply, 'utf8');
      logger.write('Send initialize response to the server.');
      break;
      }

      }
   }
Now, the editor know what magic can the lsp perform.
File Sync
We have often talked about how the lsp knows of editor state. It is because when we open or update any file. The editor will respond with an event that provides the filename and filecontent to the lsp. And we will update our internal state accordingly.
I will show a very simple way to keep track of the editor state. We will just keep the filename and filecontent in an object.
Create a file src/analysis/state.ts and write the following
export class FileState {
  constructor(private state: Record<string, string> = {}) {}

  // it means opening a document
  addFileState(filename: string, content: string): void {
    this.state[filename] = content;
  }

  // it means changing the content of the document
  updateFileState(filename: string, content: string): void {
    this.state[filename] = content;
  }
}
Now, we have a way to keep track of editor state. As stated earlier, editor will respond with textDocument/didOpen and textDocument/didChange for opening and updating file respectively.
But, what is the structure of the message sent by the editor when a document is opened or when the document is updated. We get a DidOpenTextDocumentNotification and DidChangeTextDocumentNotification from the editor.
To parse such notification make the following changes.
Create a src/lsp/message.ts file. There are three types of messages:
- requestMessage
- responseMessage
- notificationMessage
When we receive something from the editor it contains requestMessage with params. When we send something to the editor it contains responseMessage with results. When we send notification to the editor it contains notificationMessage with extra stuff.
Inside your src/lsp/message.ts
// src/lsp/message/ts

import * as z from 'zod';

export const requestSchema = z.object({
  jsonrpc: z.string(),
  id: z.number(),
  method: z.string(),
});

export const responseSchema = z.object({
  jsonrpc: z.string(),
  id: z.number().optional(),
});

export const notificationSchema = z.object({
  jsonrpc: z.string(),
  method: z.string(),
});
Again, create another file src/lsp/textDocument.ts
// src/lsp/textDocument.ts

import * as z from 'zod';

export const textDocumentItemSchema = z.object({
  uri: z.string(),
  languageId: z.string().optional(),
  version: z.number().optional(),
  text: z.string().optional(), // the actual content of the opened file.
});

export const textDocumentIdentifierSchema = z.object({
  uri: z.string(),
});

export const versionTextDocumentIdentifierSchema = z
  .object({
    version: z.number(),
  })
  .merge(textDocumentIdentifierSchema);

const positionSchema = z.object({
  line: z.number(),
  character: z.number(),
});
export type positionT = z.infer<typeof positionSchema>;

export const textDocumentPositionParamsSchema = z.object({
  textDocument: textDocumentItemSchema,
  position: positionSchema,
});

export const rangeSchema = z.object({
  start: positionSchema,
  end: positionSchema,
});
export type rangeT = z.infer<typeof rangeSchema>;

export const locationSchema = z.object({
  uri: z.string(),
  range: rangeSchema,
});
What does this file contain? It is the basic building block for all textDocumentRequest and textDocumentResponse. How do I know all these schemas? Well all the structure of message is provided by the specification from microsoft . When you look at the documentation you will realise what the structure of the message is and what schema you should write.
Again, create a file src/lsp/textdocument-didopen.ts
import * as z from 'zod';
import { textDocumentItemSchema } from './textdocument';
import { notificationSchema } from './message';

const didOpenTextDocumentParamsSchema = z.object({
  textDocument: textDocumentItemSchema,
});

export const didOpenTextDocumentNotificationSchema = notificationSchema.merge(
  z.object({
    params: didOpenTextDocumentParamsSchema,
  }),
);

export type didOpenTextDocumentNotificationT = z.infer<
  typeof didOpenTextDocumentNotificationSchema
>;
To summarize, when we receive a textDocument/didOpen method from the editor it has the following structure. Everything we did above is to validate this json structure.
{
    jsonrpc: "2.0",
    method: "textDocument/didOpen",
    params: {
        textDocument: {
            version: <number>,
            uri: <fileurl>,
            languageId: <markdown-for-.md, typescript-for-.ts>,
            text: <whole-file>
        },
    },
}
Similarly, create a src/lsp/textdocument-didchange.ts
// src/lsp/textdocument-didchange.ts

import * as z from 'zod';
import { notificationSchema } from './message';
import { versionTextDocumentIdentifierSchema } from './textdocument';

const textDocumentContentChangeEventSchema = z.object({
  // whole file change is contained here
  text: z.string(),
});

const didChangeTextDocumentParamsSchema = z.object({
  textDocument: versionTextDocumentIdentifierSchema,
  contentChanges: z.array(textDocumentContentChangeEventSchema),
});

export const didChangeTextDocumentNotificationSchema = notificationSchema.merge(
  z.object({
    params: didChangeTextDocumentParamsSchema,
  }),
);
To summarize, when we receive a textDocument/didChange method from the editor it has the following structure. Everything we did above is to validate this json structure.
{
    jsonrpc: "2.0",
    method: "textDocument/didChange",
    params: {
        textDocument: {
            uri: 'fileurl',
        },
        contentChanges: [
            {
               text: 'filechanges'
            }
        ],
    },
}
So, make the following changes in your src/main.ts;
// src/main.ts


// add a new global class object
import { FileState } from './analysis/state';

const globalState = new FileState();

// update your handleStdMessage signature
// pass globalState from inside process.stdin.on('data' => ...)
function handleStdMessage(
  baseMessage: baseMessageT,
  content: string,
  logger: FileLogger,
  fileState: FileState,
) {
     ...
}


// after the case 'intialize' add more cases 'textDocument/didOpen' and 'textDocument/didChange'

    case 'textDocument/didOpen': {
      const { success, data } =
        didOpenTextDocumentNotificationSchema.safeParse(jsonContent);

      if (!success) {
        logger.write("Couldn't parse for textDocuemnt/didOpen");
      }

      // sync the file state with lsp
      fileState.addFileState(
        data.params.textDocument.uri,
        data.params.textDocument.text,
      );

      logger.write('Opened file: ' + data.params?.textDocument?.uri);
      break;
    }

    case 'textDocument/didChange': {
      const { success, data } =
        didChangeTextDocumentNotificationSchema.safeParse(jsonContent);

      if (!success) {
        logger.write("Couldn't parse for textDocuemnt/didChange");
      }

      // sync with lsp
      // since change will send an array
      data.params.contentChanges.forEach((change) => {
        fileState.updateFileState(
          data.params.textDocument.uri,
          change.text,
        );
      });

      logger.write('Changed file: ' + data.params?.textDocument?.uri);
      break;
    }
You can now restart the edior. Create any .md file and make changes to the file and observe the log.
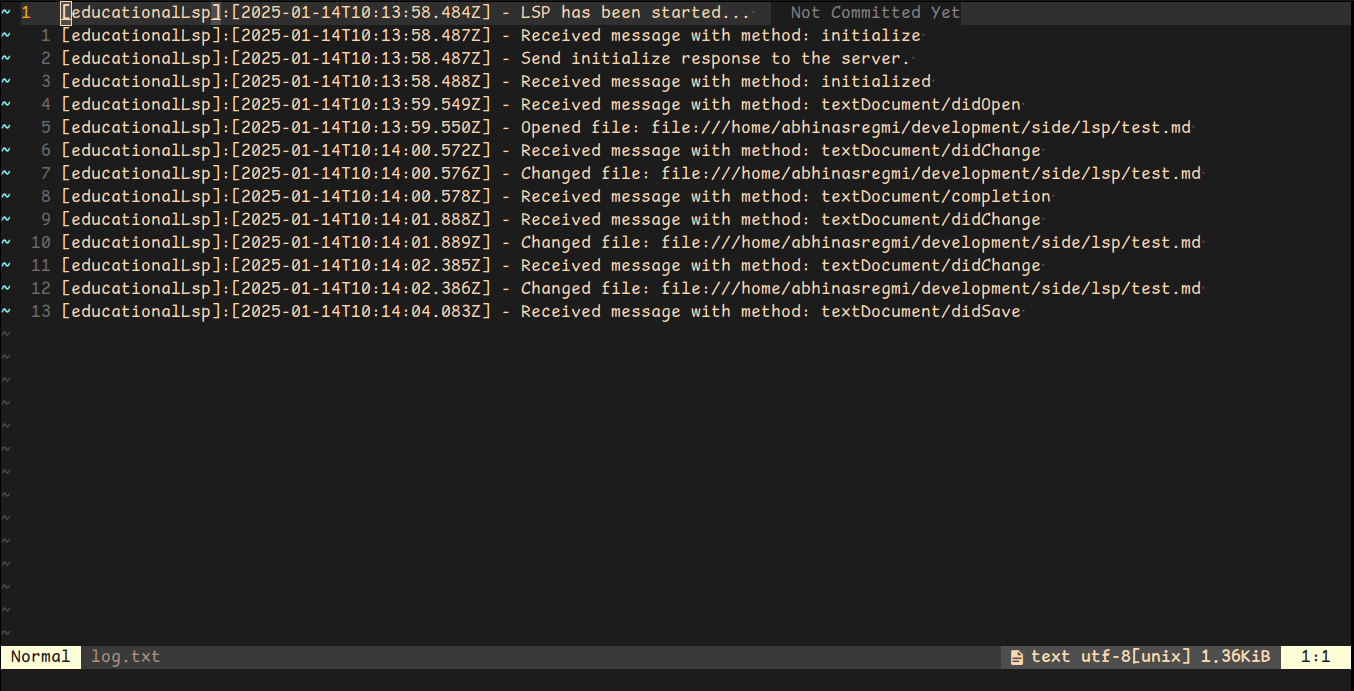
You can see we have multiple events for textDocument/didOpen and textDocument/didChange.
Hover
Similar to textDocument/didChange we have textDocument/hover event when user hovers in an editor. The structure of the message sent from editor during hover is:
// this is a typescript interface

{
    jsonrpc?: string;
    id?: number;
    method?: string;
    params?: {
        textDocument?: {
            uri?: string;
            languageId?: string;
            version?: number;
            text?: string;
        };
        position?: {
            line?: number;
            character?: number;
        };
    };
}
Similarly, we have to respond to the hover event whose structure is:
// ts interface

{
    jsonrpc?: string;
    id?: number;
    result?: {
        contents?: string;
    };
}
You can learn more about the textDocument/hover from the specification. Here, the result in hoverResponse contains contents which is the actual content that will be displayed when hovered.
Now, let us create a file src/lsp/textdocument-hover.ts
//src/lsp/textdocument-hover.ts

import * as z from 'zod';
import { requestSchema, responseSchema } from './message';
import { textDocumentPositionParamsSchema } from './textdocument';

export const hoverRequestSchema = z
  .object({
    params: textDocumentPositionParamsSchema,
  })
  .merge(requestSchema);

const hoverResultSchema = z.object({
  contents: z.string(),
});

export const hoverResponseSchema = z
  .object({
    result: hoverResultSchema,
  })
  .merge(responseSchema);
export type hoverResponseT = z.infer<typeof hoverResponseSchema>;
Now, in order to respond to hover we will add a method to FileState
// src/analysis/state.ts
// add a method hover to FileState

  hover(id: number, filename: string): hoverResponseT {
    const file = this.state[filename];

    return {
      id,
      jsonrpc: '2.0',
      result: {
        contents: `file: ${filename}, characters: ${file.length}`,
      },
    };
  }
Finally, we will log the hover request and respond with the help of hover method form FileState object. However, we have done something very simple for the hover. It will respond with filname and length of filename. You can see that complex analysis could be done and something meaningful could be returned from here.
Add a new case inside your handleStdMessage as following
// src/main.ts


    case 'textDocument/hover': {
      const { success, data } = hoverRequestSchema.safeParse(jsonContent);

      if (!success) {
        // logger.write("Couldn't parse for textDocuemnt/hover");
      }

      const message = fileState.hover(data.id, data.params.textDocument.uri);
      const reply = encodeMessage(message);

      process.stdout.write(reply, 'utf8');
      logger.write('Send hover response to the server.');
      break;
    }
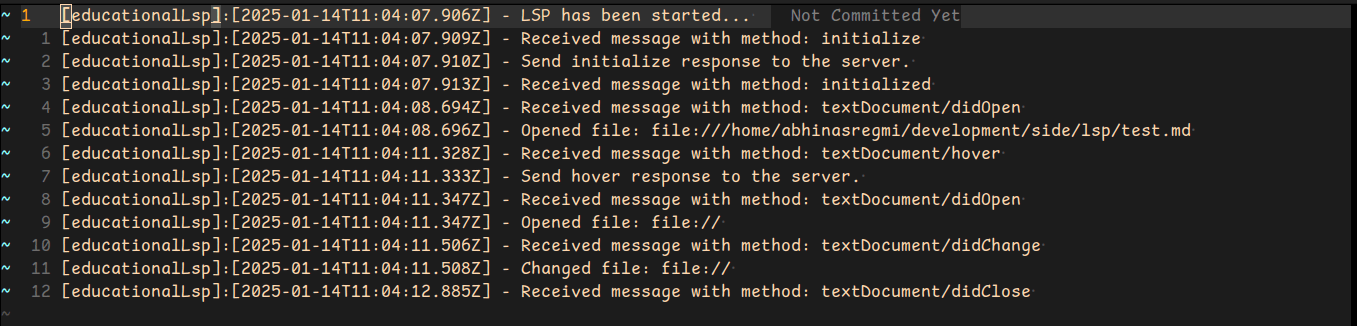
You can see, we have encoded the required hover response and sent it through the std-console to the editor; Now restart the editor, visit your .md file hover over something and see the result.

Similary, if you observe the log you can see at line 6, a log when a hover request is received from editor.
Auto Completion
Now, you have to do the same thing as above. Read the specification for completion request. You will receive a method called textDocument/completion.
Interface for json sent by the editor
{
    jsonrpc?: string;
    id?: number;
    method?: string;
    params?: {
        textDocument?: {
            uri?: string;
            languageId?: string;
            version?: number;
            text?: string;
        };
        position?: {
            line?: number;
            character?: number;
        };
    };
}
Interface for json we have to send to the editor
{
    jsonrpc?: string;
    id?: number;
    result?: {
        label?: string;
        detail?: string;
        documentation?: string;
    }[];
}
Here label is the actual text that will be used for autocompletion and other provide extra documentation.
We will implement a simple auto-completion based on string. Make the following changes to your FileState.
// src/analysis/state.ts
// add a completion method to your FileState class
completion(id: number, filename: string): completionResponseT {
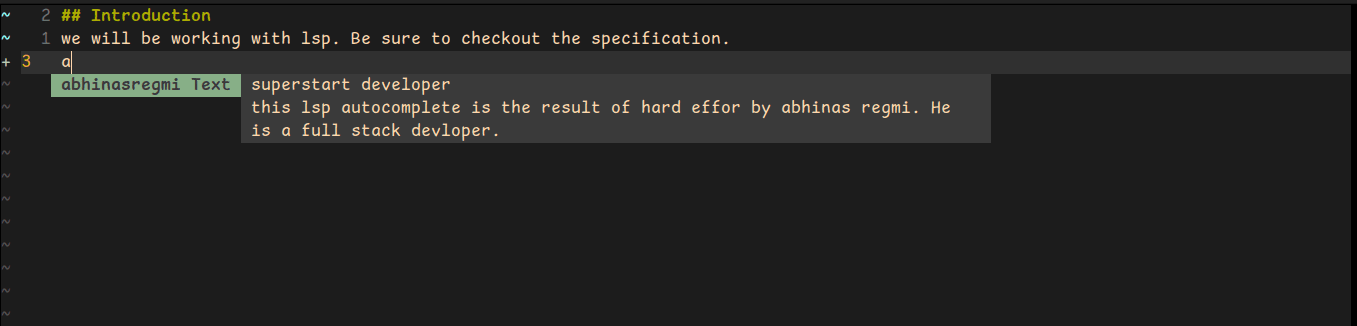
const items: Array<completionItemT> = [
{
label: 'neovim',
detail: 'super editor',
documentation: 'This is an absolutely must have editor for poweruser.',
},
{
label: 'vscode',
detail: 'editor by almighty microsoft',
documentation:
'This is a good editor created by microsoft for the developers.',
},
{
label: 'abhinasregmi',
detail: 'developer',
documentation:
'this lsp autocomplete is the result of hard effort by abhinas regmi. He is a full stack developer.',
},
];
return {
id,
jsonrpc: '2.0',
result: items,
};
}
Finally, make changes to your main.ts. Add a new case to your handleStdMessage.
// src/main.ts

// inside your handleStdMessage
    case 'textDocument/completion': {
      const { success, data } = completionRequestSchema.safeParse(jsonContent);

      if (!success) {
        logger.write("Couldn't parse for textDocument/completion");
      }

      const message = fileState.completion(
        data.id,
        data.params.textDocument.uri,
      );
      const reply = encodeMessage(message);

      process.stdout.write(reply, 'utf8');
      logger.write('Send completion response to the server.');
      break;
    }
Restart your editor and open your .md file. Try to write abhinasregmi. You should now see your result.
Diagnostics
Phew, We did a lot of stuff. Diagnostics are error or squigly lines you see in and editor. Diagnostics are special than other messages we sent or received.
The flow that has happened up until now.
editorsends amessage- we parse the message and send approprate
response
All the communication has been editor initiated. However, Diagnostics are lsp initiated. If your are creating a serious lsp. You may perform static analysis and send notifications to the editor about the errors. But, we will not do show. We will process the file only when user opens or user changes the file. And send the diagnostics.
You can read more about this push style of diagnostics in specification.
Interface to publishDiagnosticNotification
{
    jsonrpc?: string;
    method?: string;
    params?: {
        uri?: string;
        diagnostics?: {
            message?: string;
            range?: {
                end?: {
                    line?: number;
                    character?: number;
                };
                start?: {
                    line?: number;
                    character?: number;
                };
            };
            severity?: number;
            source?: string;
        }[];
    };
}
Now create a new file called textdocument-diagnostics.ts
// src/lsp/textdocument-diagnostics.ts

import * as z from 'zod';
import { notificationSchema } from './message';
import { rangeSchema } from './textdocument';

const diagnosticsSchema = z.object({
  range: rangeSchema,
  severity: z.number(),
  source: z.string().optional(),
  message: z.string(),
});
export type diagnosticsT = z.infer<typeof diagnosticsSchema>;

const publishDiagnosticsParamsSchema = z.object({
  uri: z.string(),
  diagnostics: z.array(diagnosticsSchema),
});

export const publishDiagnosticsNotificationSchema = z
  .object({
    params: publishDiagnosticsParamsSchema,
  })
  .merge(notificationSchema);
export type publishDiagnosticsNotificationT = z.infer<
  typeof publishDiagnosticsNotificationSchema
>;
We will create the diagnostics in FileState. Add a getDiagnosticsFor private method. We need to specifiy the line number and the word's starting and ending index for diagnostics. We we will create a helper function getLineRange for that purpose. Now, your complete FileState should be as shown below.
// src/analysis/state.ts
// add a new helper private method
#getLineRange(line: number, start: number, end: number): rangeT {
return {
start: {
line,
character: start,
},
end: {
line: line,
character: end,
},
};
}
// analysis of each line to provide diagnostics
#getDiagnosticsFor(filename: string): Array<diagnosticsT> {
const diagnostics: Array<diagnosticsT> = [];
const file = this.state[filename];
file.split('\n').forEach((line, i) => {
// if the line contains vscode show error
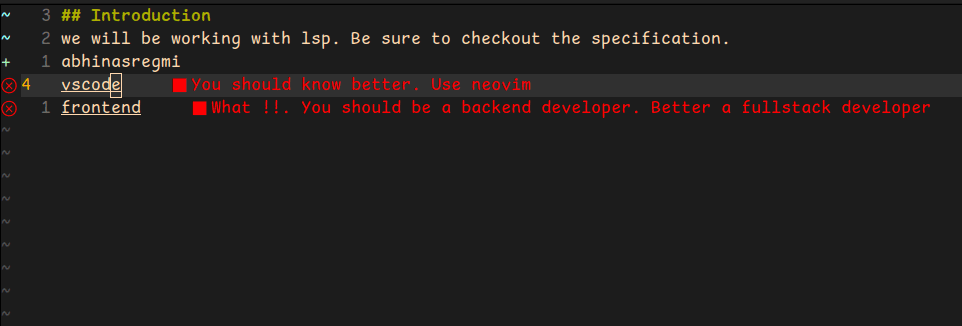
if (line.includes('vscode')) {
const idx = line.indexOf('vscode');
diagnostics.push({
range: this.#getLineRange(i, idx, idx + 'vscode'.length),
severity: 1,
source: 'educationalLsp',
message: 'You should know better. Use neovim',
});
}
// if the line contains frontend show error
if (line.includes('frontend')) {
const idx = line.indexOf('frontend');
diagnostics.push({
range: this.#getLineRange(i, idx, idx + 'frontend'.length),
severity: 1,
source: 'educationalLsp',
message:
'What !!. You should be a backend developer. Better a fullstack developer',
});
}
});
return diagnostics;
}
// update this method to return diagnostic
addFileState(filename: string, content: string): Array<diagnosticsT> {
this.state[filename] = content;
return this.#getDiagnosticsFor(filename);
}
// update this method to return diagnostic
updateFileState(filename: string, content: string): Array<diagnosticsT> {
this.state[filename] = content;
return this.#getDiagnosticsFor(filename);
}
What is happening in getDiagnosticsFor ?
- create an array by splitting the file with
\n - loop through each line and check if
vscodeis present in the line - if
vscodeis present find the starting and ending index forvscode - add the diagnostics for that line with severity. (severity can be error, info, warning, etc)
You can perform such simple checks with other strings too, instead of just vscode.
Since, we have decided to send diagnostics during file opening and file updating. We will need to modify the case for 'textDocument/didOpen' and 'textDocument/didChange'.
// src/main.ts

    // update 'textDocument/didOpen' case
    case 'textDocument/didOpen': {
      const { success, data } =
        didOpenTextDocumentNotificationSchema.safeParse(jsonContent);

      if (!success) {
        logger.write("Couldn't parse for textDocuemnt/didOpen");
      }

      logger.write('Opened file: ' + data.params?.textDocument?.uri);

      const diagnostics = fileState.addFileState(
        data.params.textDocument.uri,
        data.params.textDocument.text,
      );

      const message = {
        jsonrpc: '2.0',
        method: 'textDocument/publishDiagnostics',
        params: {
          uri: data.params.textDocument.uri,
          diagnostics,
        },
      } satisfies publishDiagnosticsNotificationT;

      const reply = encodeMessage(message);
      process.stdout.write(reply, 'utf8');

      logger.write('Send publish diagnostic notification');
      break;
    }

    // update 'textDocument/didChange'
    case 'textDocument/didChange': {
      const { success, data } =
        didChangeTextDocumentNotificationSchema.safeParse(jsonContent);

      if (!success) {
        logger.write("Couldn't parse for textDocuemnt/didChange");
      }

      logger.write('Changed file: ' + data.params?.textDocument?.uri);
      data.params.contentChanges.forEach((change) => {
        const diagnostics = fileState.updateFileState(
          data.params.textDocument.uri,
          change.text,
        );

        const message = {
          jsonrpc: '2.0',
          method: 'textDocument/publishDiagnostics',
          params: {
            uri: data.params.textDocument.uri,
            diagnostics,
          },
        } satisfies publishDiagnosticsNotificationT;

        const reply = encodeMessage(message);
        process.stdout.write(reply, 'utf8');

        logger.write('Send publish diagnostic notification');
      });

      break;
    }
Now to see diagnostics in action restart your editor and write vscode in any .md file.
Conclusion
The editor magic is nothing more than communication between an editor and an lsp. There are many features and I encourage you to study more. Also, there is github repo consisting of all the program that we did in this article.
I hope you enjoyed this article.
Keep searching and Keep learning. Happy Coding 💩💩