- Published on
How to make most out of your Neovim Setup ?
- Authors

- Name
- Abhinas Regmi
- @AbhinasRegmi
Introduction
We have all been there trying to find the best optimal setup for our vim or nvim editors. I'll like to share the setup that takes the least effort but you can get the best results.
What will we be working on ?
- Install kickstart (the best thing there is to get base configurations)
- Remapping some shortcuts
- Installing new plugins
- Installing lsp and other extensions like in vscode
- Using the file navigation
- Installing git related extensions
Installing kickstart
Your journey to awesome nvim experience starts with kickstart. Initial requirements for this installation are
- nvim
- git
- ripgrep - this is required for telescope
- nerdfont - this is optional. Makes icons look better. Install for your distribution.
Now after you have installed all of the above packages we will proceed with installation of kickstart. It provides a default configuration for your nvim setup. It includes most of the features that we require like telescope for fuzzy finding files and other things, Mason for installling external extensions like the neotree, and a lspconf for your lsp neeeds.
git clone https://github.com/nvim-lua/kickstart.nvim.git "${XDG_CONFIG_HOME:-$HOME/.config}"/nvim
Now you can open your nvim instance with
nvim
You should see a simliar screen with multiple extensions and plugins being downloaded. This is the work of lazy the plugin manager.
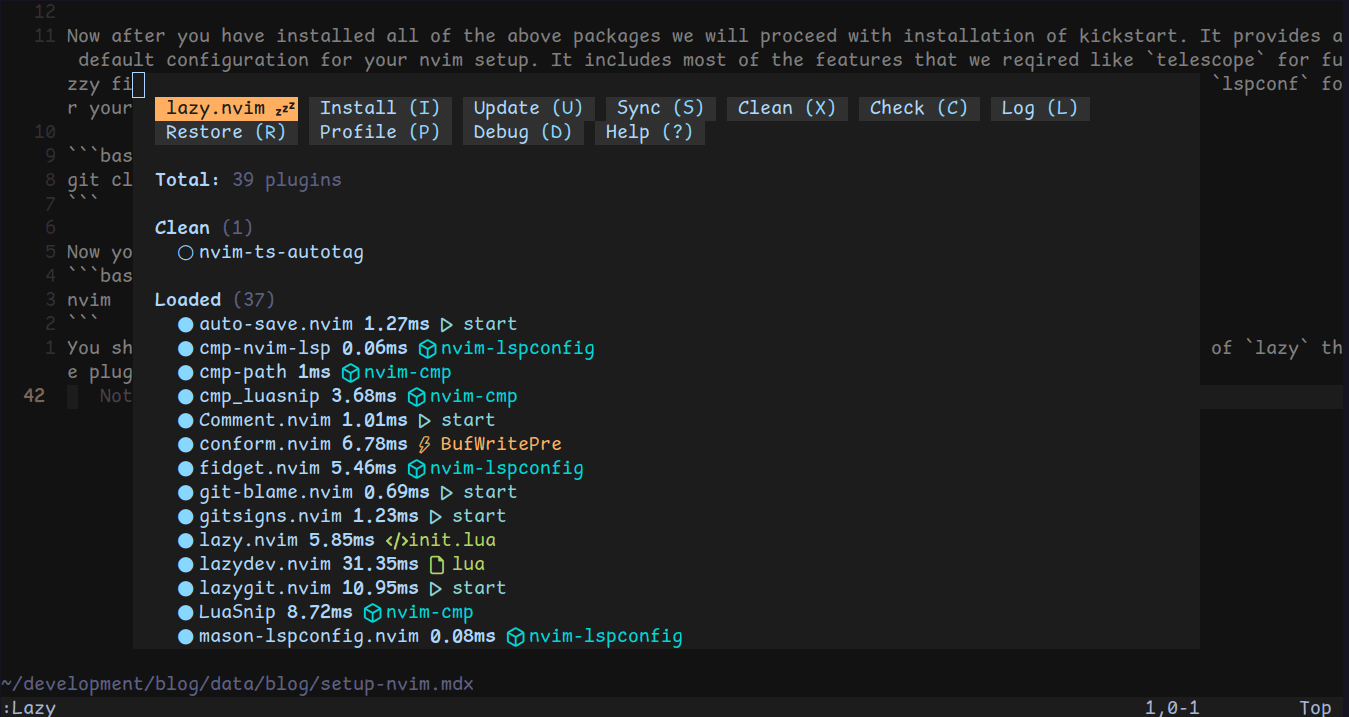
You can exit this panel by pressing q. You can press ? for help.
Lazy (the plugin manager)
As we have seen the lazy plugin manager above. You can access the manger at any time by entering Lazy in the commandline of nvim and pressing enter.

The major configuration for lazy happens in your init.lua file present in $HOME/.config/nvim/init.lua. You can open this file from any instance of nvim by pressing <leader>sn and searching for init.lua.
Note: <leader> is space bar & this should be done in normal mode.
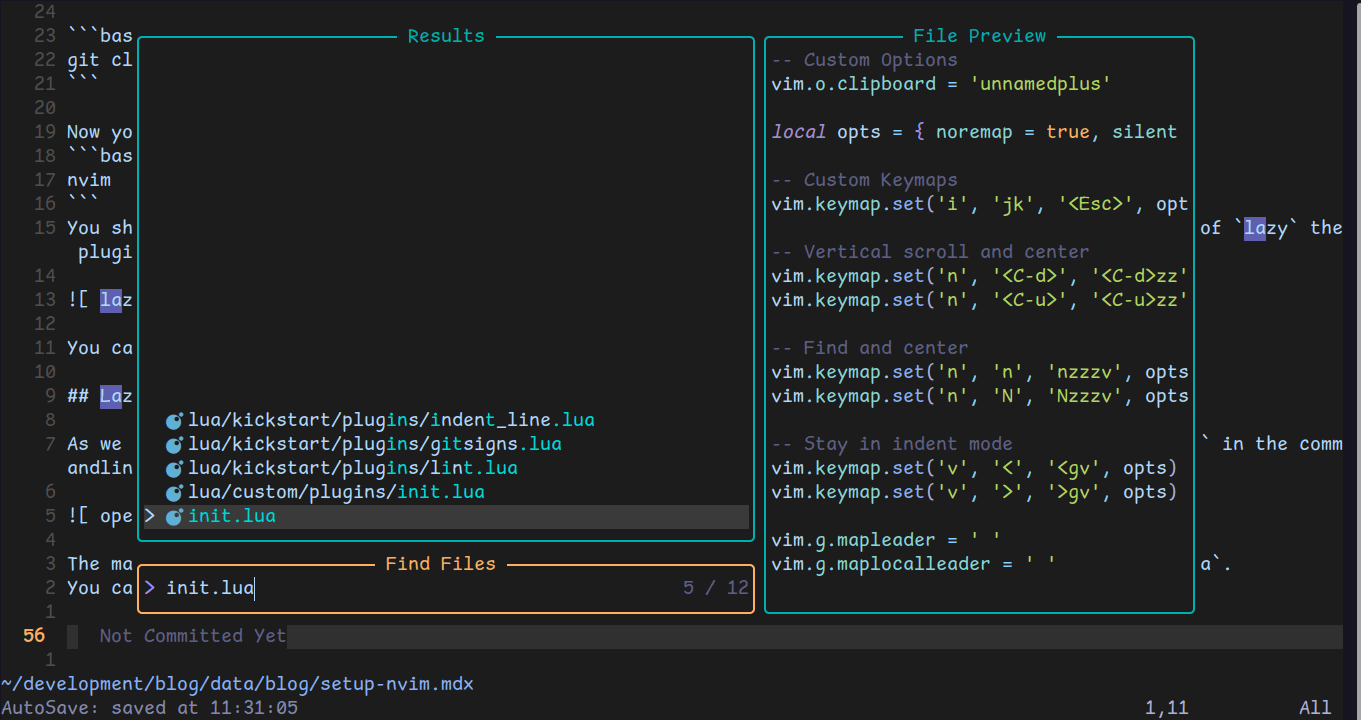
To install any plugins you have to go to the init.lua file and add the plugin github location inside the lazy .
-- inside the required('lazy').setup()
-- you have to pass the object with plugin name (githubusername/repo)
-- and options if necessary and reload the nvim
-- to reload you can exit the nvim and reopen it again.

--- we will install git blame that will show the author for code changes
  {
    "f-person/git-blame.nvim",
  },
We will see an example of how to use the config with telescope plugin. You can direct telescope to not fuzzy search certain directories like node_modules, dist, '.venv'.
-- inside the setup
-- require('telescope').setup {
defaults = {
  file_ignore_patterns = {
    'node_modules',
    'dist',
  },
-- other telescope configuration.
-- Do not change other stuff.
Custom keymaps
The most powerful feature to any editors like nvim or vim is the ability to set custom keymaps.
Some of my custom keymaps are
-- Custom Options
vim.o.clipboard = 'unnamedplus'

local opts = { noremap = true, silent = true }

-- Remap esc to jk so that you can exit insert mode by jk fast sequence
vim.keymap.set('i', 'jk', '<Esc>', opts)

-- Vertical scroll and center
vim.keymap.set('n', '<C-d>', '<C-d>zz', opts)
vim.keymap.set('n', '<C-u>', '<C-u>zz', opts)

-- Find and center
vim.keymap.set('n', 'n', 'nzzzv', opts)
vim.keymap.set('n', 'N', 'Nzzzv', opts)

-- Stay in indent mode
vim.keymap.set('v', '<', '<gv', opts)
vim.keymap.set('v', '>', '>gv', opts)

vim.g.mapleader = ' '
vim.g.maplocalleader = ' '

-- set line wrap
vim.keymap.set('n', '<leader>lw', ':set wrap! <CR>', { desc = 'Toggle line wrap' })

-- Save files
vim.keymap.set('n', '<leader>ff', ':wall <CR>', opts)

-- Buffers
vim.keymap.set('n', '<leader>bd', ':bd<CR>', { desc = 'Delete the current buffer.' })
vim.keymap.set('n', '<leader>bda', ':%bd|edit#|bd#<CR>', {desc = "Delete all buffers except the current buffer."})

-- Cycle through the buffers
vim.keymap.set('n', '<Tab>', ':bnext<CR>', opts)
vim.keymap.set('n', '<S-Tab>', ':bprevious<CR>', opts)

-- Setup for tabs spacing
vim.opt.tabstop = 3 -- Number of spaces a <Tab> counts for
vim.opt.shiftwidth = 3 -- Number of spaces to use for each step of (auto)indent
vim.opt.expandtab = true -- Use spaces instead of tabs
vim.opt.softtabstop = 3 -- Number of spaces for <Tab> in insert mode

-- Resize windows with <leader>w[
vim.keymap.set('n', '<leader>w[', function() vim.cmd('vertical resize -5') end, { desc = 'Shrink window width' })

-- Resize windows with <leader>w]
vim.keymap.set('n', '<leader>w]', function() vim.cmd('vertical resize +5') end, { desc = 'Increase window width' })

-- Set to true if you have a Nerd Font installed and selected in the terminal
vim.g.have_nerd_font = true

-- Toggle autosave. You have to install this plugin as I described above.
vim.keymap.set('n', '<leader>ts', ':ASToggle<CR>', { desc = 'Toggle auto save' })

-- Show relative line numbers
vim.opt.number = true
vim.opt.relativenumber = true

-- Open file tree. See the file tree section to enable this plugin
vim.keymap.set('n', '<leader>ft', ':Neotree current <CR>', { desc = 'Open file tree' })

-- Split window
vim.keymap.set('n', '<leader>wv', '<C-w>v', { desc = 'Split window vertically' })
vim.keymap.set('n', '<leader>wcs', '<C-w>s', { desc = 'Split window horizontally' })

-- Navigate between windows here <CR> simulates the enter press
vim.keymap.set('n', '<leader>wh', ':wincmd h<CR>', { desc = 'Navigate to left split' })
vim.keymap.set('n', '<leader>wl', ':wincmd l<CR>', { desc = 'Navigate to right split' })
vim.keymap.set('n', '<leader>wk', ':wincmd k<CR>', { desc = 'Navigate to upper split' })
vim.keymap.set('n', '<leader>wj', ':wincmd j<CR>', { desc = 'Navigate to lower split' })
Mason (all-hail-the-mason)
Mason is similar to extension store in vscode. You can enter command Mason in the command mode to open up a similar window. You can install various plugins, extensions, lsp and even linters.
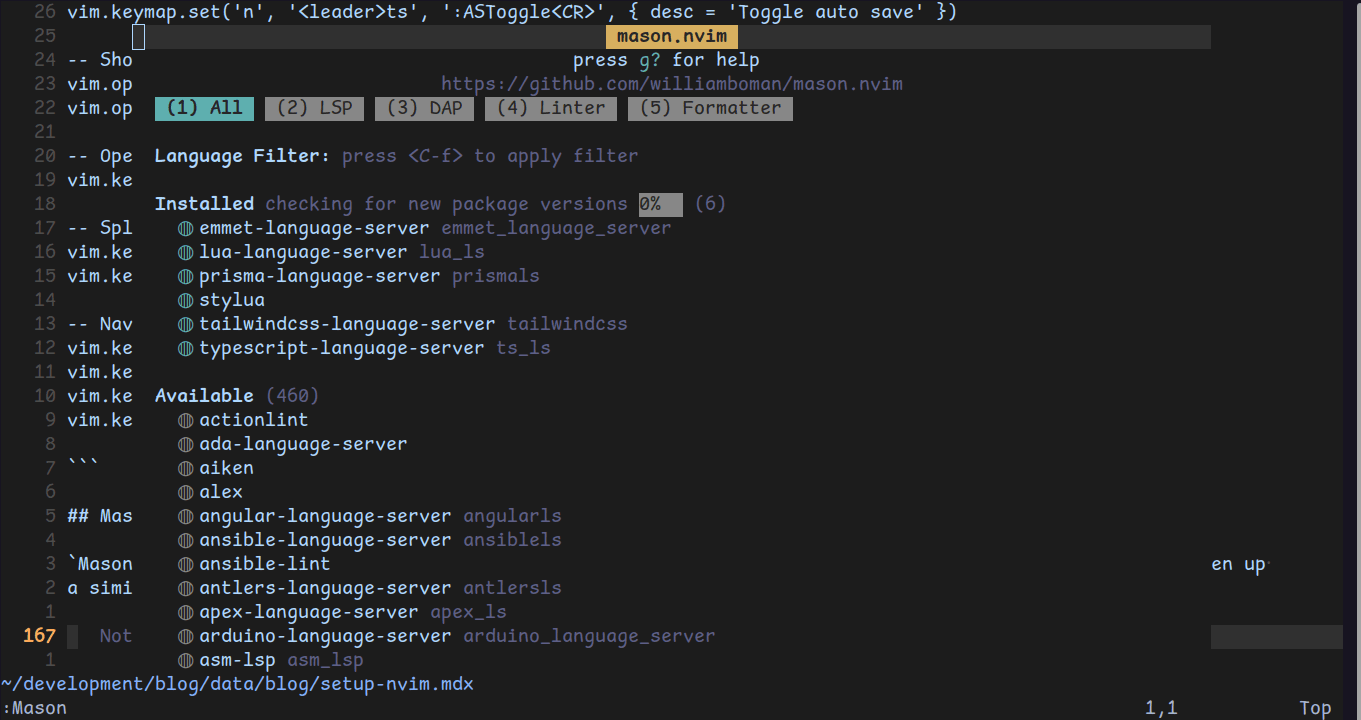
- press
ctrl+fto open up search menu where you can search for any extensions. - once you find the required extension press
ito install the extension. - sometimes the
idoesn't work for me - so I do
:MasonInstall <extensionname>in command to install new extensions.
File tree
-- uncomment this line in the init.lua file
require 'kickstart.plugins.neo-tree',
The neo-tree has a lot of features like creating new files, deleting files and moving files and so on. neo-tree hides the .files and other files like node_modules by default so to toggle hidden files press shift + h.
Git ecosystem
The thing that always stopped me from moving to neovim from vscode was the lack of extensions and visual git support. I absolutely need the git diff and git add from the vscode git extension. When I found about Mason, Lazy and LazyGit journey with vscode was over.
The best git extension to ever exist.
-- Lazygit plugin
-- Keep inside the config of lazy as shown earlier
  {
    "kdheepak/lazygit.nvim",
    lazy = false,
    cmd = {
      "LazyGit",
      "LazyGitConfig",
      "LazyGitCurrentFile",
      "LazyGitFilter",
      "LazyGitFilterCurrentFile",
    },
    -- optional for floating window border decoration
    dependencies = {
      "nvim-telescope/telescope.nvim",
      "nvim-lua/plenary.nvim",
    },
-- custom keymap to start lazygit
    keys  = {
      {"<leader>lg", "<cmd>LazyGit<cr>", desc="Open lazy git"}
    },
    config = function()
      require("telescope").load_extension("lazygit")
    end,
  },
Now you can restart the nvim to install the plugin. Now when you press <leader>lg and enter you get a similar view.
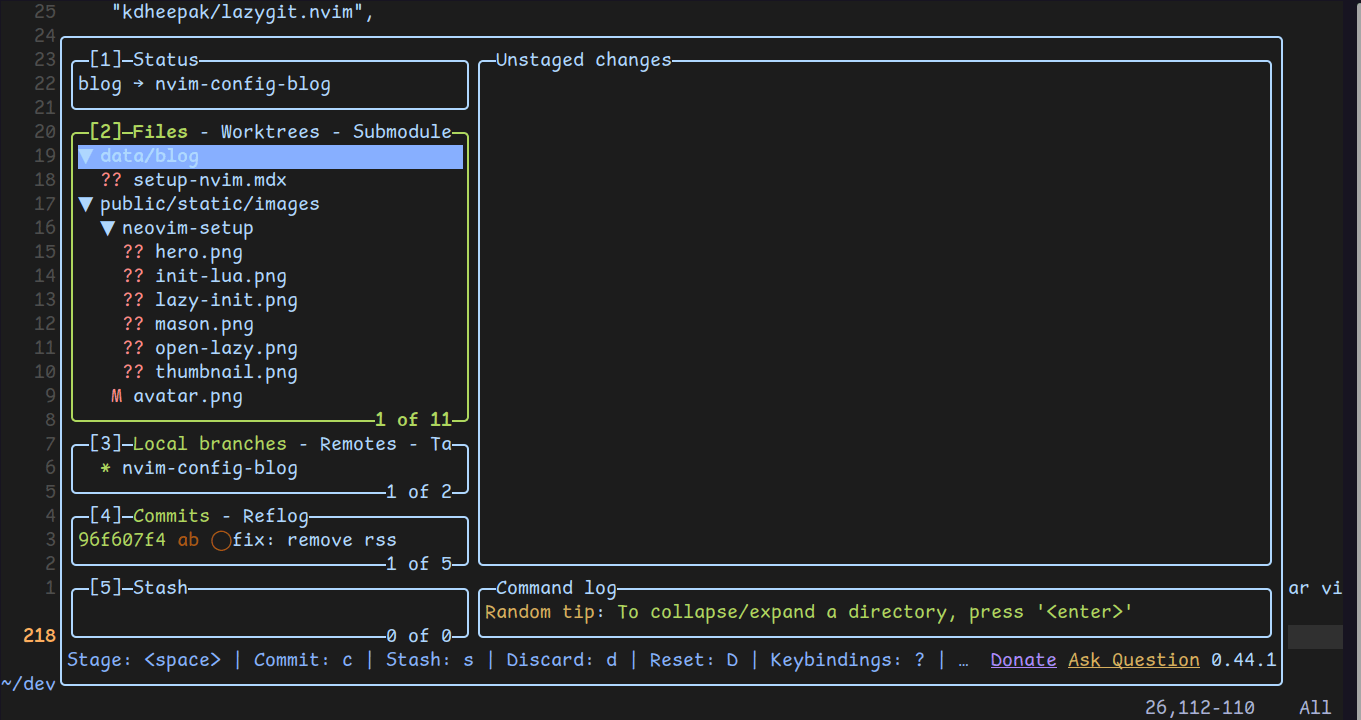
Press ? for keybindings help.
I can navigate between files using the j and 'k' also I can move between the tabs using h and l.
The major keybinding I use are
ato stage all files<space>to add individual files.cto commit staged files.- You can enter the commit message and press
<enter>to commit. qto quit the panel 😁
There are tons of features in lazygit explore and customize acccording to your needs.
Conclusion
I guess that is all I have for now. I hope you enjoyed this article.
Keep searching and Keep learning. Happy Coding 💩💩